12.31.2010

Itty bitty ruffle apron tutorial

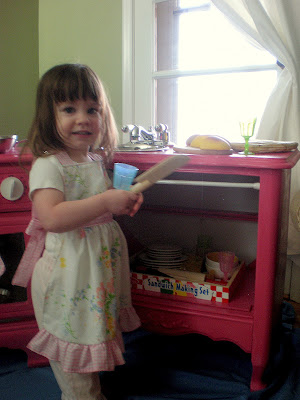
 I made Mim a little apron to go with her kitchen.  And I took a bunch of pictures, so thought I might as well make a tutorial about it. 

I cut all my pieces first.  A top, a bottom, straps, waist band, and bottom ruffle.  All the gingham strips are 3.5" wide.  The top is about 11" by 9" (in the picture below it's folded in half).  The top of the bottom is twice the width of the top section (so, 18 inches) and then widens out about 3 inches on each side.  (The bottom is also folded in half in the picture below.)

First thing I did (because I just wanted to get it out of the way) was fold the waistband and shoulder straps in half (right sides together) and then turn them all. 

 After they're turned, I pressed them with the seam down the center in the back.

Then I did a rolled hem on bottom of the bottom ruffle strip (which was about twice the length of my bottom piece, around 48" or so).
 

Then I folded the top piece right sides together and sewed around the open edges, except for between the pins (about an inch and a half).

Then I turned and pressed it, making sure the raw edges were pressed under in the openings I left.


I inserted the shoulder straps into the openings, pinned, and then top stitched around the top and sides of the top piece.  I was at the top of my game.  (C'mon, that was solid!)

I didn't take pictures of the next bits- a rolled hem along the sides of the bottom piece and a gathering stitch around the top.

Then I was ready to attach the waistband piece (I think it was like 36" long or so- I wanted it really long so I could make a big bow in the back).  I pinned it across the top, then top stitched.


Then I attached the top and bottom.  I had to be a little weird about this because my machine is old and crazy and has a really hard time handling layers and ruffles all at once.  If you have a good machine, you could probably simplify my last couple of steps, but you work with what you have, right?

I don't have a picture of the back, but the top part overlaps the messy ruffle bit, but isn't sewed down over it.  The top is connected to the bottom because it's top stitched to the waistband. 

I don't have pictures of the last few bits- doing a gathering stitch on the top of the ruffle strip, gathering it, and then attaching it to the bottom (right sides together).  As for the shoulder straps, you could just tuck the ends under to finish them and then leave it and tie it onto your little one, but I went with d-rings.  I won't explain it without a picture.  I'm pretty sure it says how to use them on the package, anyway.  
And there it is!  She loves wearing it around, so I'm counting it as a success. 

Mim's Christmas


A kitchen set!  My parents' have one at their house that my dad made (from scratch) for my older sisters and when ever Mim's over there, it's the only thing she wants to play with.  So I decided to make her one for Christmas.  I've loved this idea ever since I first saw it out in blogland- this post, via Ucreate, was the first one I'd ever seen.


First I got my nightstands on KSL (a local classifieds).  They were 20$ a piece each, solid wood, and had the scallopy look I was hoping for.  I intentionally didn't want them to match- I figure if I ever add on (like a tall nightstand for a fridge), then I won't have to worry about the one of these things is not like the other look.

Here's what I started with (I didn't take these pictures until after I had begun the deconstructing process):

I love the hardware on this dresser.  I'm saving it for something else, though.
The other dresser:

This one wasn't as lovely, but was perfect for the stove/oven combo.  
See?

Mike put in the acrylic window so she can see what she's baking, and you can't see it, but there's an oven rack (cooling rack) inside.  The knobs are craft circles with half a heart glued onto the top, which, besides giving it that real knob shape, hide the screws drilled through the circle and through the door front, so they really turn.  

The sink unit was easy- the thing that probably took the most time was making the nightstand structurally sound.  I was lucky with the faucet- my dad had an old one out in the garage that he had uninstalled years ago that I could have.  The sink is a dog dish.  The curtain covering the front is on a little tension rod.  Easy.  

Also, the sink is intentionally off center; it wasn't some horrible accident.  I put it off to the side because of a conversation with my sister in law I'd had a few days before- she was talking about her daughter's kitchen set and how she wished there was just some counter space.  So with the sink off center, she has the other half to put her cutting boards and stack her plates.


Mim loved it.  It was all set up for her to see when she got up and she headed straight for it asking "Wha is it?" over and over, then she filled up cups in her sink and gave them to me and Mike to drink.

I love it, too.  Mim has a toy she'll play with for years (size-wise, it'll be at least another two or three years until she's proportional to it) and that subsequent kids can play with for years, too.

12.19.2010

Great day @ DI

I gave my last batch of students their final this morning and stopped by the DI (for those of you not in Utah, it's pretty much a Goodwill).  I never find good stuff there (with the exception of this one chair I found and will someday make a slipcover for and then will blog about), but I think I totally scored today.

I didn't find the one thing I was looking for (nightstand for Mim's Christmas), but wandered and found some other stuff I got really excited about:

 Little milk jug, two super awesome candlestick holders, an apothecary jar and a pedestal vase/hurricane thing.
The design on the milk jug:
 I was thinking I would spray paint it white and use it in the spring, but I don't know anymore- the design is really growing on me.  What do you think?

The candlesticks are already spray painted and on display- they're what I'm most excited about, probably.  I have been looking/considering buying candle pedestals at a number of places, but always balk at the price (even when Hobby Lobby had them half off).  I really wanted some for my mantle, though.  So here these are.  The crappiest spray painting job I've ever done (when it's warm again, I'll redo them), but I still love it. 
 So, a week from Christmas, my mantle is pretty much the way I want it to look.  I bought some little sparkly stuff from Hobby Lobby awhile ago and want to put it in the new DI glassware, but I CANNOT find it ANYWHERE.


Oh, I also got the crystal platter in the background from DI on my trip today, but forgot to put it in the first picture.  It reminds me of a snowflake.

The tarnished brass plate is also from DI, but a few weeks ago.

You know how PB and Ballard always have gorgeous white birch or aspen branches they use for decorating?  I don't have any white-barked trees, but I found out that a light coat of white spray paint on a normal gray/brown branch makes it look naturally white.  You can see a bit in the picture below:

PB baby trees

Last year, PB had these little live trees that you could buy in burlap sacks (I didn't see them this year).  I liked them, but failed to plant seeds several years ago to grow my own live ones.  So I hacked some branches off our juniper tree (that I usually hate that that's coming down in the spring), stuck them in mason jars full of water, and tied burlap around the jars with ribbon.  And so you see:
I love any excuse for more greenery, especially the real stuff.  I might go back and actually sew the bags, so they have little corners, but the odds of that aren't really great; especially with all the Christmas presents I still need to make.  (I can't wait to show you what Mim's getting!)


12.09.2010

The back door wreath

After seeing the ornament wreaths everywhere last year, I decided to make one.  I used some old ornaments that I wasn't using on the tree anymore and went for it, but I didn't have enough to make one as big as I wanted.  So I bagged it (literally, all the stuff that went into the making of it was all together in a garbage bag when I unpacked Christmas this year).  I brought it out and thought about getting more ornaments to finish it.  Bah.  Then I was at the dollar store and I saw the tinsel and I thought of the cover of the Martha Stewart magazine this month and WHAM:

Tinsel glitter ornament wreath!


The wire that I strung the ornaments on was not up to holding this business up, so I wired a big embroidery hoop to the back to reinforce it and it's holding up great.  And I totally love it. 


It was really easy, too.  Since I had all my ornaments strung up on the wire already, all I did was close the loop and then wrap garland over the wire and between the ornaments.  Three garlands is all I  used, but I might go back and add one or two more to chunk it up a bit.  We'll see.  I'm definitely going to go get more garland- I might go a bit tinsel crazy.


Anyway, that's the conclusion of my wreath craziness- I made this one and the ones in the previous 2 posts all in one night. 

From last year...

 I saw this last year:

Totally love it.  I loved how simple it was and how it fulfilled my need of making cards into something (I hate just throwing them away, but I also hate just having them around with no official place).  It's like last year, when I made a garland of my baby's birthday cards to decorate for her party.  Anyway, here's the card wreath, my version.
It would probably look more wreathy if people would send me tiny Christmas cards, like they do for Martha Stewart.  I still like it. 

Cheapo wreath to awesome

It's been awhile.  Thanks for not unfollowing me.  I haven't done anything since the embroidery hoop ornaments because of a few things- writing tests for my students and my husband herniating a few disks (or was it discs?) in his neck.  He was in the hospital for 3 days but he's home now and doing well.  I'm just glad it wasn't any worse (because it could have been paralyzed-worse).  We're almost back to normal, actually.  The biggest difference to me is that he can't drive (big neck brace).  The biggest difference to him is probably the burning nerve pain in his arms (which is a bummer, but at least now we can joke about it).
So, just today I got back on the craft wagon.  I probably won't be getting some of my bigger projects done this year (felt nativity hand puppets and stockings) but it's cool.  I'm on track for finishing Christmas shopping before the 24th, so I'm happy with that.
And now, what this post is all about:
This is my front door wreath.  Yeah, it's a little cheapie one I got somewhere and then glued pinecones to it to improve its look.  My crafting in the past year has come far, if I do say so myself.
I also dug my old centerpiece from my Christmas stuff yesterday.  It was kind of a bough swag that had 3 taper candle holders in it- on the formal side and just not what I'm going for anymore.  However, it was made of some quality fake greenery.  I took it apart (you can see pieces of it on the left hand side of the picture), basically disassembling it into picks, then stuck it all on my sad wreath with hot glue (reinforced by twisting wires together).
And now:
It looks so much more expensive, right?  I love it.  I toyed with adding a bow or maybe a sign nestled in there, but I decided to go with au naturale for now. 

11.22.2010

Embroidery hoop ornaments

I made some pseudo ornaments with embroidery hoops the other day.  For now they're hanging on our mantel hooks, but they'll be distributed elsewhere once I break out the Christmas decorations for reals and I make new stockings. 


Super easy and I really like them.  I spray painted the hoops, put some fabric in them and gussied it up, then twisted some wire wrapped some wire around the top and bent it into a hook.  Maybe this will get me back in my crafting grove.

11.16.2010

Sad face shirt fail

After the old man shirt skirt, I wanted to make myself more stuff.  It didn't go well.

 There's the fail.  I very carefully removed some ruffles, but it didn't go well.  Well, I started started removing ruffles carefully, but then after I made a bunch of little but noticeable holes, I gave up and ripped the second ruffle off (those are the bigger holes you can see).  
I'm pretty sure the real root of the problem was not having a clear idea of what I wanted it to look like.  After I realized my original idea wasn't going to happen because I wouldn't have enough shirt left over, I didn't take time to adapt my plan.  
It started off well, at least:
I've learned my lesson- next time I'll make sure I have a doable plan.  There will be a next time, too.  I realized I can make a whole army of embellished tees from knit shirts from the thrift store, and I want to do it.

Some headbands

I made these awhile ago.  They were presents for my sister-in-law that I repeatedly forgot to give to her.  Simple to make, but I really like how they turned out (hope she does to!)


11.05.2010

Old man shirt skirt

See?  It's a skirt made from an old man shirt. 
Its beginning:
We had this old man shirt floating around our house and I was going to make a dress for Mim out of it.  Then I decided I wanted a skirt.  Mim has a ton more clothes than I do, so it's justified.

I cut it up first:

And here's how I put it back together:

I can't decide if I'm glad I preserved the original hem shape or not.  My original plan didn't call for a ruffle, and that's why I wanted to preserve the hem at first, but maybe when I cut it off to add the ruffle I should have just done it straight across.  I can't decide.  Here it is for now, at least:
In reality, I'd wear it with boots.  

And from the side:
It's super comfortable.  The flannel is all worn and soft- I think this is an ideal fall/winter skirt for me.
It was so stinking hard to take pictures of myself in this.  I was bending over all awkwardly, stretching out as far as I could to get a wider angle...it was awesome.  Oh, and I was totally in an ugly pink t-shirt and my hair was in a towel turban.  It was super.
This one was a miss, but check out those gorgeous leaves behind me.  I can't remember a fall in Utah ever lasting as long as this one has.  It's fabulous!