Showing posts with label home. Show all posts

9.12.2013

Giant script name

I had a clean slate after I finished painting Eleanor's room. It was great. I had taken down everything and I planned on nothing going back up for a little while, until I could think about things. I knew I wanted her name up on the wall somewhere, but I didn't really want to go with anything that was out there already. Then, one day, inspiration hit. I realized I wanted to cut out her name in some kind of script font in one big piece and hang bunting behind it. I really don't even know what made me think of it, but I went for it.

First, I had to think about how to get a template. I ruled out free-handing it almost immediately since I wanted it to be script and I just don't have the skills to do that, especially since there were 2 of the same letter (I figured being consistent would be a big problem). I thought about using an overhead projector and asked on facebook if anyone knew where I could get one. There were some ideas, but then a friend offered to print it on a large format printer, so that was taken care of. If that's not an option for you, I'm betting there's a way to print something that big in pieces using Photoshop or Illustrator or their free counterparts, Gimp and Inkscape.

The total size of the template was about four feet across and eighteen inches high (give or take). I taped it up in place to see how it looked and I loved it. 

Once I confirmed that the template was the right size, I took it down and taped it to my 3/8" thick mdf and traced it, then removed it. Handy tip: use a yardstick or other straight edge to correct any tracing mistakes made on a straight line.


 Then I jigsawed it out. The employee who helped me at Home Depot gave me another really great tip- he recommended laying my board on top of a thick sheet of styrofoam laying on the floor and cutting through both. I'm so glad I bought that styrofoam. Trying to maneuver this big sheet around on sawhorses and supporting the parts I had cut out would have been a real pain. Plus, now I have this styrofoam for all my jigsawing needs.

Another tip: make sure you get a jigsaw blade for cutting curves. They're daintier than ones that are for mostly straight lines and it really makes a difference with how sharply you can turn.

After it was cut, I used my Dremel with a coarse sanding drum to smooth out any rough spots around the edges, then sanded it lightly by hand. Finally it was just priming and painting and I was done!

Except for hanging it. I used these: 


and a laser level to make sure it was hung nice and straight.


And then...

Ta-da! I love it a lot.

5.03.2013

Used furniture is the best kind of furniture

So, I've been looking for a few different things on KSL (a local classifieds) and craig's list for some time. Since before our basement was finished, at least. Anyway, I finally got a great deal on a white mid-century dresser to use in our living room! And just a few days later, I found an awesome industrial-ish old metal desk to use for my sewing table! Huzzah! I should hurry and do some more thrifting before my luck runs out. Anyway, here they are:


Do you see that giant pile of junk off to the right? That's not even half of what I had to move to make room for this desk. Oh man. 

4.26.2013

Indoor cat door

This may seem like a weird thing to some people (or maybe an obvious thing, I don't know), but putting a cat door on our storage room door was genius.

To explain, when our basement was unfinished, Danger (the cat) could just run downstairs to get to her litter box and her food and water. We had a door at the top of the stairs with a chain lock on it, so I would keep that on but the door open and Danger could slip through that little 6 inch gap and my daughters could not. Our stairs looked like this,
{These are some freaky steep stairs, folks.}
so it was really important to make them inaccessible to our toddler.

Well, I started thinking about how I would handle the littler box and the cat food as we got closer and closer to finishing and one day it occurred to me that we could just put a cat door on the storage room door to cut off toddler access to those things (Eleanor is still 2 or 3 inches away from being able to get an actual grip on the door knob, so a closed door will be enough of a deterrent for awhile yet). I wouldn't have to worry about having the door open for Danger and closed for Eleanor. Brilliant!

The installation was very straight forward and simple. I followed the instructions that came with the cat door we got (it was this one) and basically just found the center of the door, traced the shape of the cat door so it would be centered, then cut it out with a jig saw and screwed the door in. So simple.


My jigsaw lines weren't perfect, but the cat door has that little casing bit that covered them up. I'd do a whole hallway shot, but right now the hall leading up to this door is so full of junk that if I backed up much farther the cat door would be obscured by boxes. Hooray!

So, now that I've shared my genius plan, what do you think? Would you have cut a big ol' hole in your brand new door? 

4.24.2013

Done gone painted my rug

Last year I tried to find the rug I wanted for about 6 months. I never really did, but I did have a thought- what if I got a carpet remnant bound and then painted it? I could get exactly what I wanted, in the colors I wanted. I immediately got a rug after that. I went to a local carpet warehouse and talked to them about what I was going to do and got some good input, as well as a great deal on a remnant. They bound it for me and my total cost was about $250 for a 9' by 12' rug. Such an amazing deal for a rug that size, even if it was just plain grey. They even gave me several largish scraps for free so I could try some different painting methods out.

I've thought about what I wanted to do with it for about 6 months. I wanted to bring in some green and some blue as well as cream, but I really couldn't decide on a pattern. I thought about something floral, but ruled it out because I kind of wanted something less traditional and lots of fun. I thought about something geometric and that really appealed to me because it would be simple and still look really nice. I had lots of ideas, but nothing I actually wanted to commit to (obviously, since the rug was blank for 6 months).

Then, just a few weeks ago, it hit me. FAUX BOIS. That's French for "fake wood," pretty much. I've seen it around a lot lately, like this quilt here and this post at Design Sponge. I absolutely loved it here, when Mandy painted a floor. But even then it didn't occur to me as a rug design. Then it hit me (it was totally a cartoon light bulb kind of moment) and a few days later I got to it.

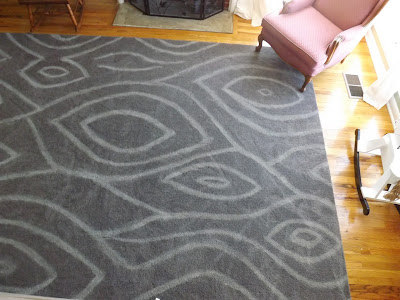
Before I started, though, I decided to search "faux bois rugs" and some awesome stuff popped up. I liked this one a ton and decided that's what I'd go for. A few hours of painting and here it is:
 I pretty much love it. I free handed it all and just went with whatever. It worked ok, but in retrospect I do wish I'd planned a little more, maybe by making a template and then marking the rug with a grid using painter's tape. Even with all the little weird bits, I still love it.
I also love this effect:

 Because of how the living room is lit, as you walk in the pattern looks very subtle. You almost don't notice it. Then you sit down on the couch and it's like BAM!


Here's how I painted my medium pile rug without making it all crusty and unpleasant to the touch. Before I perfected my method, I experimented with both latex and acrylic paints, mixing in different things, applying it different ways, and post application treatments. I could have kept experimenting, but I found one that worked and I was out of carpet scraps to experiment on so I stuck with it.

These were my materials:

Acrylic paint, textile medium, water, sponge brush, PAPER TOWELS, and a stiff bristle scrub brush. Nothing too crazy, right?

1.  I mixed the paint and textile medium as per the instructions on the textile medium bottle, which I believe were to mix 2 parts paint to one part medium.

2.  Then to that mix I added some water. I always just eyeballed it, but I would guess it was about 4 parts paint mix to 1 part water. Give or take.

3.  Then I painted. Every 4-5 feet I would stop and take some slightly damp paper towels and scrub over the line(s) I had painted. I did that to take up excess paint and to spread around any uneven bits my brush had left. THIS STEP IS THE VERY MOST IMPORTANT ONE. Seriously, scrub and scrub with those paper towels. Also make sure you're following your lines as you scrub so you don't spread paint to parts that aren't supposed to be painted. I think I used a whole roll of paper towels for my rug.

4.  Then you let it all dry overnight. It will be at least a little stiff the next morning. Some parts might feel pretty bad, even. Don't despair, though!

5.  This is what the stiff bristle brush is for. You have to get down on your knees and scrub the lines and break those little paint covered carpet fibers apart. I thought I'd have to go over everything, but after some very thorough vacuuming there were only a few parts that needed extra attention.

And there you have it- a painted rug that's not flat woven and is still soft and awesome. The possibilities with this are endless- what if you wrote lyrics to a favorite song or words to a favorite poem on a rug (you could use a washable marker to write things out first, then trace over with the paint)? I don't think I'm finished painting this one yet, I've got the urge to add more color already.

PS- That rug I liked to above is almost a thousand bucks and is an 8'x10'. Mine was $260 ($250 for the rug, $10 in materials) and is a 9'x12'. I feel pretty good about that.

4.19.2013

My daughter's favorite things about her new room

Mim absconded with my phone the other day and took some pictures of her favorite things in her new room. (That's what she told me she had done after I got my phone back from her)


The light is my favorite thing, too. 

There's just a few more finishing touches that need to happen and then I guess I'll do a full room reveal. (I feel pretentious saying that, since it doesn't really feel that grand.) Stay tuned.

10.08.2012

Sometimes progress is just a big giant mess

A giant mess with holes and dust and dirt and rusty pipes EVERYWHERE.

I've mentioned before that our basement isn't finished. Well, it just might be by the end of the year!! I've been insanely excited about it. Like when I heard the plumber could move where our water line came into the house, it MADE MY DAY. I told him that about 10 times, too. And while thinking about having the basement finished just gives me happy hives, sometimes the mess does put a bit of a damper on things. Here's what the last few weeks have looked like:
{This is a plumbing mess.}
We were getting two new floor drains (the existing one is in our family room space) and the bathroom fixtures roughed in. It was an entire day full of dust and noise.


Don't worry about the giant pile of dirt that's overtaking the walk up to my front door. I don't. We (which, in this case, is pretty much just my little brother) had to dig window wells so people could come cut giant holes in the foundation of our house with giant saws. Four giant holes, four giant window wells (they had to be dug 4 feet back from the house, a foot on either side of where the cut needed to be made, and 18 inches deeper than the bottom cut).


Dirt was (still is) literally everywhere.

Oh no! The water pipe!


It's cool, just dig down 2 more feet. That's what we needed to do to have the water line entrance moved and still be good to go, code-wise. Small price to pay to have the window be where I wanted it. I could have stood at the bottom of that hole and been buried standing up.

Then they came and cut the big giant holes. You may have picked up from my tone that I was kind of nervous about this, despite the fact that they were ready to go with the steel lintels that would take the weight of the house. It's just... a big giant hole in the load-bearing concrete wall your house is built on. Right? That's scary.
Things were fine, though, and now you can stay tuned for part 2, when progress actually looks like progress.

9.17.2012

This was cool

I saw this posted over at Young House Love (excellent blog, you should check it out) and I wanted to share. I love online quizzes like this. (At this point, I would like to point out that this quiz is not of those Facebook ones that are like, "Oh, based on the letters in your name, you're a totally beautiful, super fun, smart, sexy woman who likes to hang out with people you love!!" I hate those and I hate when anyone on my newsfeed takes one.)

So anyway, here's a link to the quiz. You pick the 5 images you like the best and it comes back with a quick little analysis. I took it several (read: a bunch) times and mostly got urban funk. It kind of sounds like a catch-all category, but I like it.

I'll be back later this week with something real! (There's at least an 80% chance of it, at least.)

Thanks for reading!


8.17.2012

Non-permanently painting a KitchenAid

So, I think everyone has seen the custom cut vinyl for KitchenAids. I've seen some crazy intricate ones. Just google "custom kitchenaid vinyl" if you haven't. Wow.

So even though I have a Silhouette and could easily make one for my own, I still haven't, because...reasons. Or not really any reason at all. As it would happen, though, I had some friends come over last night to work on a craft project and we ended up cutting vinyl for their KitchenAids (which was not the project we got together to work on, of course).

I had the vinyl negative left of one of the decals that I held on to because I thought it would make a good stencil for... something. And then it hit me. Why not use it to stencil my KitchenAid? I want to do light blue or yellow vinyl, which I don't have yet, so in the meantime...

I used acrylic paints and tested a little patch first. I just dabbed some on with my finger, let it dry, then made sure it scratched off as easily as I thought it would.

Then...


So that'll hold until I get vinyl in the color I want. There are some parts where it seeped under the stencil, but I'll just wait until it dries and then scratch it off. So easy. I wish I was a talented painter- I'd do an all-over floral design. Sigh. I suppose it wouldn't be worth it, since this probably won't take thorough wipe downs very well.
 

8.16.2012

I got lucky

No, not like THAT. Or maybe I do mean like that. None of your business. *blushing*

The title is referring to a gift certificate I won to a local flea market. Fleaology. Here's their blog. I submitted my name for the drawing they do before each one, and I got 3 entries because I blogged about my last flea market finds here. Anyway, I won $50! That, plus the money I'd already set aside to spend there, made me feel like I was gearing up for an awesome little shopping spree. And it WAS awesome. Look, I'll show you:

{I saw this and made a beeline for it. I always keep an eye out for globes. And it was only $15!}

{This doesn't match anything in my house, but I just kept going back to it again and again. It's embroidery.}

{It needs a new place to hang, of course. Or maybe I just need a headboard and some more things to hang by it. Hmm...}

{I'll hopefully make a move on my bathroom redo soon, so that this can stop looking terrible next to those dark green walls. It's awesome for all the stuff I want to keep in the bathroom but don't want little hands to get at.}

{See that awesome scarf with the yellow border? Three dollars. Booyah.}

{I've been looking for awhile for a hard suitcase for dress-up storage, but they're always either too much money or too small. This giant was only ten bucks and in almost perfect condition.}

{Everything fits! (With some room to spare, even)}

{I like wearing the brooches in my hair. I don't know what I'll do with the clip on earrings, but it'll be something.}

{It's a metal peacock! This is another one that I'm not sure why I bought it. I love it. I mean, I parked it on the mantle temporarily, but over a month later it's there because I just love how fun it is.}

I forgot to take pictures of a few things, like another little globe. It's small and white on a brass stand. I also got my new favorite necklace EVER for $2.50. I got a big vintage melon crate, too, but it's still in the garage. It needs a good scrubbing before it's allowed inside. Anybody else had awesome luck lately?

6.06.2012

Pinspired on wheels (a double whammy)

I realized that without context, my title sounds pretty much like gibberish. So here's your context, then.

Double whammy:
This pinspiring was brought to you by THIS PIN and THIS PIN.


I thought those clutter crates were totally a good idea and was totally (maybe?) going to get around to making some. And then, more recently, I saw the BHG drawers on wheels. And that's when the pinspriation hit. I totally had an old drawer in the basement that I had saved when we were demolishing stuff down there. I could get my clutter crate and not even have to build it!

So here's the drawer:
It's pretty big. There was some wallpaper in the bottom that just pulled up. I decided I wanted to put it back after everything got a good scrubbing, so I kind of washed the off the sticky side (which had a bunch of gritty dirt and cat hair on it) and then reattached it with a thin layer of mod podge on the bottom of the drawer.
 I also added blocks to the corners because the kind of casters I used had a post on them. I used liquid nails and it got a little bit messy, but I didn't really care.

After the blocks were secure, I drilled holes and attached the casters as per the instructions on the package. And....DONE! Super easy.

Here it is, all filled up and on wheels. Now my big girl can drag her blocks wherever she wants to.
{It's hard to see the wheels because they're sunk into the carpet a bit, but they're there.}


I'm so glad her blocks have a permanent place to go. I had them in an under-the-bed tupperware, but there were too many and it could be tricky to get them all in and still have it fit under her bed (especially for a 3 year old). No under the bed problem with this, because I don't want it under the bed. It's too cute/handy to be hidden away.

See how I made the blocks HERE.
My last Pinspired post HERE.

5.29.2012

Thrift finds

So, there's a flea market in Utah County. It's called Fleaology and they have a blog HERE. I went with some friends a few weeks ago (they only have it quarterly or so, I believe) and scored some pretty awesome stuff.
I think this mirror is awesome. I think I'll probably give it to Mim some day for her dress ups, but I think I'll wait until she's a little older and I won't have to worry so much about her breaking it. For now it goes on my dresser, which is fine with me, since it totally reminds me of Beauty and the Beast, which is my favorite fairy tale/Disney movie.

 The brown scarf was a DI (Utah's Goodwill) find, but the red with white polka dots was from the flea market- 2 bucks!

These are my new awesome flour and sugar canisters. They're awesome. I only wish I had more counter space (since it's so limited in my tiny kitchen, they're usually in the cupboard).

 I did not happen to find any zippered pouches at the flea market, but I did get about 2 yards of this awesome strawberry/floral/polka dot for $9. I didn't get any pictures of it before I started cutting it up.
 
 This was not a thrift find. It's from the old swamp cooler that used to go in our living room window. That monster is out behind the shed, waiting to go to the dump, but I noticed this wheel on it a few days ago. I thought it might be kind of a neat little keepsake, plus it kind of reminded me of these from Pottery Barn:
PB Found Movie Reel, Small
They're no longer available, but I remember seeing them in a catalog and thinking they were pretty cool.

Anyway, I've been pretty pleased with my thrifty finds lately. Anybody want to go garage sale-ing with me?