4.26.2013

Indoor cat door

This may seem like a weird thing to some people (or maybe an obvious thing, I don't know), but putting a cat door on our storage room door was genius.

To explain, when our basement was unfinished, Danger (the cat) could just run downstairs to get to her litter box and her food and water. We had a door at the top of the stairs with a chain lock on it, so I would keep that on but the door open and Danger could slip through that little 6 inch gap and my daughters could not. Our stairs looked like this,
{These are some freaky steep stairs, folks.}
so it was really important to make them inaccessible to our toddler.

Well, I started thinking about how I would handle the littler box and the cat food as we got closer and closer to finishing and one day it occurred to me that we could just put a cat door on the storage room door to cut off toddler access to those things (Eleanor is still 2 or 3 inches away from being able to get an actual grip on the door knob, so a closed door will be enough of a deterrent for awhile yet). I wouldn't have to worry about having the door open for Danger and closed for Eleanor. Brilliant!

The installation was very straight forward and simple. I followed the instructions that came with the cat door we got (it was this one) and basically just found the center of the door, traced the shape of the cat door so it would be centered, then cut it out with a jig saw and screwed the door in. So simple.


My jigsaw lines weren't perfect, but the cat door has that little casing bit that covered them up. I'd do a whole hallway shot, but right now the hall leading up to this door is so full of junk that if I backed up much farther the cat door would be obscured by boxes. Hooray!

So, now that I've shared my genius plan, what do you think? Would you have cut a big ol' hole in your brand new door? 

4.24.2013

Done gone painted my rug

Last year I tried to find the rug I wanted for about 6 months. I never really did, but I did have a thought- what if I got a carpet remnant bound and then painted it? I could get exactly what I wanted, in the colors I wanted. I immediately got a rug after that. I went to a local carpet warehouse and talked to them about what I was going to do and got some good input, as well as a great deal on a remnant. They bound it for me and my total cost was about $250 for a 9' by 12' rug. Such an amazing deal for a rug that size, even if it was just plain grey. They even gave me several largish scraps for free so I could try some different painting methods out.

I've thought about what I wanted to do with it for about 6 months. I wanted to bring in some green and some blue as well as cream, but I really couldn't decide on a pattern. I thought about something floral, but ruled it out because I kind of wanted something less traditional and lots of fun. I thought about something geometric and that really appealed to me because it would be simple and still look really nice. I had lots of ideas, but nothing I actually wanted to commit to (obviously, since the rug was blank for 6 months).

Then, just a few weeks ago, it hit me. FAUX BOIS. That's French for "fake wood," pretty much. I've seen it around a lot lately, like this quilt here and this post at Design Sponge. I absolutely loved it here, when Mandy painted a floor. But even then it didn't occur to me as a rug design. Then it hit me (it was totally a cartoon light bulb kind of moment) and a few days later I got to it.

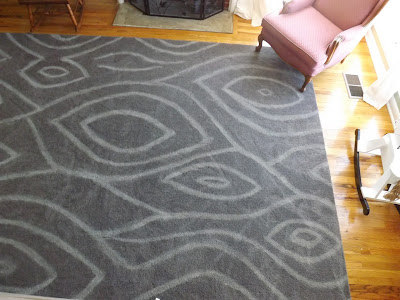
Before I started, though, I decided to search "faux bois rugs" and some awesome stuff popped up. I liked this one a ton and decided that's what I'd go for. A few hours of painting and here it is:
 I pretty much love it. I free handed it all and just went with whatever. It worked ok, but in retrospect I do wish I'd planned a little more, maybe by making a template and then marking the rug with a grid using painter's tape. Even with all the little weird bits, I still love it.
I also love this effect:

 Because of how the living room is lit, as you walk in the pattern looks very subtle. You almost don't notice it. Then you sit down on the couch and it's like BAM!


Here's how I painted my medium pile rug without making it all crusty and unpleasant to the touch. Before I perfected my method, I experimented with both latex and acrylic paints, mixing in different things, applying it different ways, and post application treatments. I could have kept experimenting, but I found one that worked and I was out of carpet scraps to experiment on so I stuck with it.

These were my materials:

Acrylic paint, textile medium, water, sponge brush, PAPER TOWELS, and a stiff bristle scrub brush. Nothing too crazy, right?

1.  I mixed the paint and textile medium as per the instructions on the textile medium bottle, which I believe were to mix 2 parts paint to one part medium.

2.  Then to that mix I added some water. I always just eyeballed it, but I would guess it was about 4 parts paint mix to 1 part water. Give or take.

3.  Then I painted. Every 4-5 feet I would stop and take some slightly damp paper towels and scrub over the line(s) I had painted. I did that to take up excess paint and to spread around any uneven bits my brush had left. THIS STEP IS THE VERY MOST IMPORTANT ONE. Seriously, scrub and scrub with those paper towels. Also make sure you're following your lines as you scrub so you don't spread paint to parts that aren't supposed to be painted. I think I used a whole roll of paper towels for my rug.

4.  Then you let it all dry overnight. It will be at least a little stiff the next morning. Some parts might feel pretty bad, even. Don't despair, though!

5.  This is what the stiff bristle brush is for. You have to get down on your knees and scrub the lines and break those little paint covered carpet fibers apart. I thought I'd have to go over everything, but after some very thorough vacuuming there were only a few parts that needed extra attention.

And there you have it- a painted rug that's not flat woven and is still soft and awesome. The possibilities with this are endless- what if you wrote lyrics to a favorite song or words to a favorite poem on a rug (you could use a washable marker to write things out first, then trace over with the paint)? I don't think I'm finished painting this one yet, I've got the urge to add more color already.

PS- That rug I liked to above is almost a thousand bucks and is an 8'x10'. Mine was $260 ($250 for the rug, $10 in materials) and is a 9'x12'. I feel pretty good about that.

4.22.2013

A most excellent egg hunt birthday

My big girl, Mim, turned 4 on April Fool's Day (such an awesome birthday). It was the day after Easter, so we decided to have a big Easter eggs hunt as part of it. We have a pretty big piece of property (that feels even bigger than it is because our bitty house is just in one little corner of it) and I've always wanted to host a big neighborhood Easter egg hunt. There was one just up the street from me when I was growing up and I LOVED going there every year. Anyway, I was thinking of this as a step up to that. We've done cousin ones for the last 2 years (that were also part of Mim's birthday celebration) that I kind of considered a warm up to this one. Baby steps.

Mim wanted to invite her preschool friends and her church class, which are about 14 and 10 kids, respectively. And the cousins that were her age, which was another 3 kids. I was like, "Sure, why not? If we invite that many, it'll probably be about a dozen that show up." I was very wrong. We had about 2 dozen kids that came. Apparently the 60% attendance rule does not apply to kids. Good thing I'm a paranoid over-preparer and we had just enough of everything.

So, the first thing the kids did as they got there was decorate their Easter "baskets."

I set up a few tables in our living room (after I rolled back the rug) and scattered supplies down the center, thusly:

I tried to give them a really wide variety of stuff to work with because I wanted this activity to last for a bit so everyone would have time to show up. They had pom poms, pipe cleaners, googly eyes, cut out shapes (including but not limited to: dinosaurs, butterflies, super heroes, flowers, stick figures, lobsters, fish, and animals) and tape and glue sticks and SOOOO many stickers and NO GLITTER. I'm not insane.
{Around $20 of dollar store stickers- I planned on having extra and I needed to restock the girls' sticker supply anyway.}
After they finished their bags I gave them all one balloon in their requested color. They chose one sticker to put on it and then we wrote their names and threw it downstairs. More on that later.
{Some of the finished bags. We had them wait in the kitchen while we rounded everyone up and put shoes on- it was pretty crazy.}
Then it was time for the big hunt. There were over 200 eggs, so even though we had many more kids than I expected it still worked out just fine. I told them to stop when they had 10 eggs and help somebody else. That kind of worked. My sweet niece got a bunch of eggs, then came up and showed me, asking "Is this more than 10?" It was about 20. I told her it was a lot more and she totally started re-hiding some and I sent the kids with only a few eggs to follow her around and gather them up.


{Almost everyone.}
We came back in and did presents and then cupcakes- the cupcakes were rainbows with clouds on top.
{Don't mind the tupperware lid serving platter. My husband is a problem solver, what can I say?}
The rainbow cupcake idea came from here (if you follow the link you can see that I obviously didn't care to much about actually layering them- I just plopped in all the different colors and let things happen), but the marshmellows on top were my idea. Anyway, the cupcakes were a big hit with the kids and I decided to not even bother with the ice cream I had bought for the occasion.

After they finished their cupcakes they got to go downstairs and find the balloon they had put their one special sticker on. The twist was that there were 130 balloons downstairs in the family room and we had mixed the marked ones up with those. When they found their balloon they took it to Mike and got a little prize, then they got to play in the balloons some more.


I can not describe 20+ kids amongst 130 or so balloons. It was amazing and loud and crazy. I just let them run amok for the last 10 minutes or so until parents came and picked them up.

It was my first party for my girl and I am marking it down as an awesome success. It was happy faces all around. There are a few things that I think were crucial to making the party work and having be as low stress as possible for me:

1. Preparation. Duh. This is true about anything. I did most things as far in advance as I could, like rolling back the rug and setting up the tables the night before, making all the decorations earlier in the week, buying most things early in the week, and making the cupcakes 2 nights before. Most of the egg stuffing happened earlier in the week, as well.

2. Helpers. I had two of my sister in laws there helping as well as my husband and my little brother. My little brother and his wife totally saved my butt the morning of- I hadn't found plain white or brown gift bags at any of the other stops I'd made (or had my husband make) and so planned on getting them the morning of the party. That all kind of fell apart so I called them in a panic to see if they could get them and they came through in a big way. They even brought chairs, since Mike was delayed on his errand and couldn't pick up the ones he'd planned to. My sweet neighbor also saved me in the chair department. I went over there in the morning when I realized Mike couldn't get the chairs and she sent me home with her kitchen table bench. Love her.

3. Keeping it simple. We only had three activities in the whole hour and a half. Decorating bags, Easter egg hunt, and balloon finding. I had some other backups in case things didn't take as long as I thought they would, like letting them all feed the chickens and a few balloon games, but we didn't need them.

Here's a few more shots of the party fun, since I feel like I've kept it reasonable so far:


{They couldn't wait to dive in}


{So many helpers with her presents.}

 That's how the party was, here's what I actually did:
First, rainbow streamers and tissue paper cloud pom poms every where:


 Second, a basement filled with balloons (I really recommend using an air compressor to blow them all up):

 The picture on the left is 130 balloons, which I thought sounded like a ton, but in reality it was much sparser than I had envisioned. For Mim's actual birthday, Mike bought over 200 more balloons that we blew up the night before. It was much more like what I had mentally pictured and Miriam was just delighted when she woke up on her birthday and saw how many balloons there were. Simple and fun and hours of entertainment.

Third, (and no pictures, sorry) eggs filled with temporary tattoos, stamps, some candy, the entire contents of Mike's change bowl he keeps on his dresser, plastic animals, bouncy balls, and tiny containers of goo. It was really fun to think of things to go in the eggs that weren't candy. I've seen a bunch of lists out there, but it was really simple and easy to just go to the little party supply store and grab a variety of tiny toys.

I also made a big cake for her actual birthday and let her help me decorate it with sprinkles. Fun stuff.

4.19.2013

My daughter's favorite things about her new room

Mim absconded with my phone the other day and took some pictures of her favorite things in her new room. (That's what she told me she had done after I got my phone back from her)


The light is my favorite thing, too. 

There's just a few more finishing touches that need to happen and then I guess I'll do a full room reveal. (I feel pretentious saying that, since it doesn't really feel that grand.) Stay tuned.

4.16.2013

MOAR MOOD BOARDS!

{Polyvore link with source list HERE}
 What's happening in the family room is different that I originally planned, but I'm loving it. Instead of doing a built in entertainment center, we ended up with a dresser in the little nook that's there. It's one I had in our garage from a yard sale last year.
It's not in the best shape, but it really grew on me and I'm just going to go with it.


{Link HERE}
 We needed a new comforter and we still don't have any rugs at all in our bedroom, so I decided to try and take that on this year, instead of finishing anything that's already in the works. (Seriously, what's my problem?) Anyway, I have pretty strong feelings (possibly inappropriate) for the exact quilt in the picture and was heartbroken when I saw Anthropologie didn't have that color in stock anymore. I had a brainwave earlier this week- ebay! I got a great deal and it'll be here soon, I hope.
{Link HERE}
The living room was left pretty blank after we got the lovesac downstairs (hallelujah) and sold our old entertainment center that was too big for the nook downstairs. I want that exact chaise lounge and those curtains, but I hope to find a buffet/dresser on Craig's List and possibly diy a display coffee table like that one.

4.11.2013

Duh.

You know how so many jewelry holders as tree and branch inspired? If you don't think they are, check out this one, this one, and this one. Well, I had a branch in an old vinegar jar on my dresser (I didn't know what to do with the branch, but I didn't want to get rid of it and it just ended up there) and today I was like, "DUH. Hang some necklaces from your overcrowded jewelry box on it." So I did.

TA-DA!

Unlike those ones I linked to above, this one is actually tall enough for all my long necklaces. 

{That's my jewelry box there in the middle of the dresser. I can fit everything in there, but with my necklace tree there is less tangling risk.}
 I love little things like this. Things that are pretty and awesome and functional, too. Oh, and simple. And free! Man, this little organizational gem has everything going for it.